

So I have replaced hubs a couple times and figured I could just post a DIY for the heck of it. If you want to know why I have replaced hubs, it's in my blog. Had to do with the BBK.
So there are some extra steps in here because I'm running a Stoptech 14" BBK and Ichiba 20mm spacers. I'm doing the right front hub for this DIY. Did the left front a few days ago.
Anyway, You need:
car jack
jack stand
Breaker Bar
21mm socket
19mm socket
10mm socket
socket wrench/ratchet
Torque wrench (83ft-lbs)
C-clamp
flat head screwdriver
socket extension
Coat hanger or other wire
about 12" angle iron or "L" bar stock - could be slightly longer or shorter for your car.
zip ties
wire brush
WD-40 or PB blaster
shop rags
First remove the wheel center cap using a flathead screwdriver.
Break the nuts on the wheel with the 21mm socket and breaker bar.
Jack up the car and put a jack stand in place.
Remove the wheel:
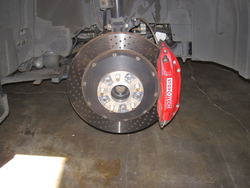
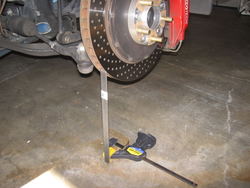
Here's a little tool to keep the rotor from spinning while breaking the nuts on the spacer. Place a peice of angle iron or "L" bar stock so that the edge is wedged up against the vane of the rotor. That way while turning the nuts counter clockwise, the rotor can't move:
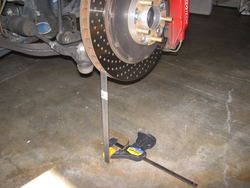
Break the nuts on the spacer and remove the spacer. These Spacer nuts use the 19mm socket.
Next, stick the key in the ignition and unlock steering (no need to start the engine) so you can turn the wheel all the way to the side you are working on (right in this case). This will make taking the caliper and hub off much easier - giving better bolt access. Turn the wheel slowly since the car is jacked up. After the wheel is turned, remove the key.
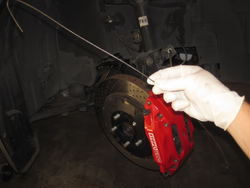
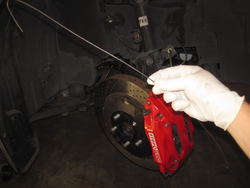
Break the bolts on the caliper torque member (both OEM and Stoptech are 19mm). Use the coat hanger, wire or zip ties to hang the caliper from the suspension spring, so that there is no strain on the brake line. NEVER hang the caliper from the brake line.
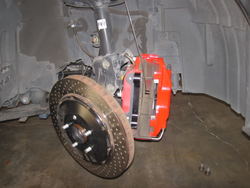
The rotor should come off now. Grab two hands and pull. If it's stuck, smack it with a rubber mallet. For a really tough stuck hub, place a peice of wood over the rotor and hit it with a sledge. Not a huge swing or anything, but start small and use increasingly harder hits until it is un-stuck.
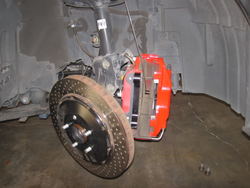
Remove the ABS sensor. If you try to pull off the hub without FIRST removing the sensor, you could damage the sensor. It takes one 10 mm socket. Unscrew it all the way and the sensor slides right out. Use a zip tie to hold it up and out of the way. This shot is from behind the knuckle/hub, looking out at the ABS sensor:
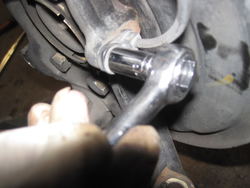
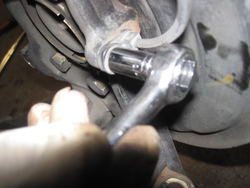
You can see two of the hub bolts in the previous picture. Four bolts hold the hub to the knuckle and come out with the 19mm socket and breaker bar.
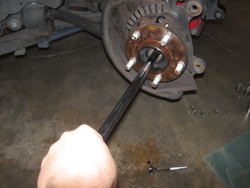
Once the bolts are out, the old hub can be pretty stuck in there. PB Blaster or WD-40 couldn't hurt. Use the breaker bar as a sliding hammer by pulling the handle through the hub from the back. It took a few hard smacks to get it out. Old and busted:
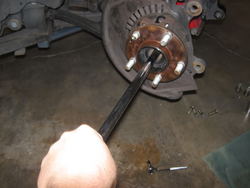
Expect it to come off unexpectedly - it's pretty heavy on the end of a 24" breaker bar. Maybe put some towels down as a cushion.
Next you have to pry loose the dust shield. Just use a flat head screwdriver and a little WD-40 if you need it.
Clean all the mating surfaces of the knuckle. Use a wire brush for oxidation, or WD-40 and a rag. Wipe down whatever is in reach.
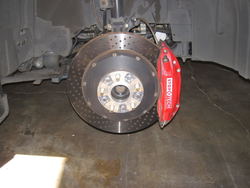
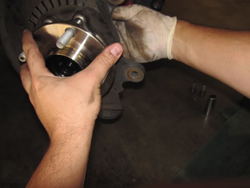
The dust shield will probably slide right on to the new hub. Line up the bolt holes and take a look at where the ABS sensor hole is to make sure there is no interference. The sensor will slide into a slot in the hub. If the slot is not there, then the hub is upside down. Just hold the hub in place and get any two opposite corner bolts started by hand. This will line up the dust shield and ABS slot and make the other two bolts easier to install. Tighten all four bolts all the way down by hand, or use a ratchet for fully seating the hub once you can't turn by hand. Then use the torque wrench and the 19mm socket to set them all to 115 ft-lbs. New hotness:
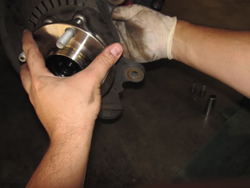
After torquing the bolts, re-install the ABS sensor. Wipe it down with a clean towel first.
Then the rotor goes back on. Make sure both the hub and rotor mating surfaces are clean. Use a couple of lug nuts backwards to seat the rotor on the hub temporarily.
Spin the rotor to make sure it doesn't contact the dust shield. Watch your fingers when you do this. If you hear the rotor contact, just lightly bend the dust shield away from the rotor.
Grab the caliper and try to keep slack in the brake line - try not to put any tension on the line.
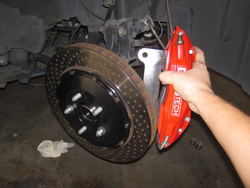
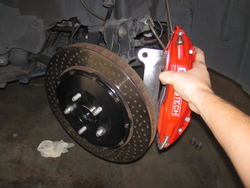
Once again, hand thread in the 19mm torque member bolts and get them fully seated. Wiggle the caliper a little while hand tightening and the bolts shouldn't resist. Use the torque wrench to 125 ft-lbs.
Now remove the temporary lugs from the rotor.
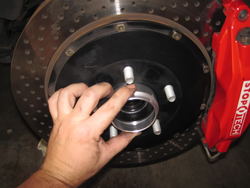
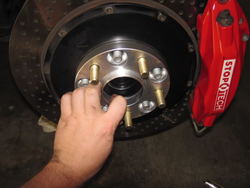
The Ichiba V2 spacers come with a hub centering ring specific to the FX hub. It slides on easily to the new hub.
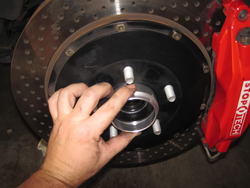
Then the spacer slides over the ring. The 19mm lug nuts are all threaded on by hand as far as possible.
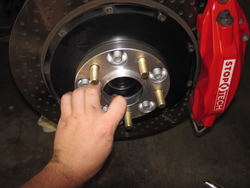
Again, use the L stock/angle iron to immobilize the rotor. This time, the bar will need to be on the opposite side of the rotor - by the caliper, because it will want to spin the opposite way. Use a torque wrench to torque the spacer nuts to 83 ft-lbs each, in a star pattern.
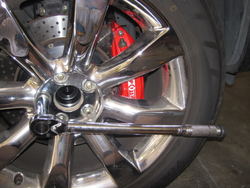
Now put the wheel back on, again hand threading on the 21mm lug nuts. After hand tight, use a ratchet on each nut until the wheel tries to spin.
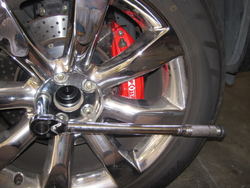
Remove the jack stand and lower the car, then use the torque wrench to 83 ft-lbs in a star pattern on the wheel lug nuts.
Yer done.
Sometimes when moving a caliper around, air bubbles can form in the lines. It might be necessary to bleed your brakes. To do that DIY you'll need a one man brake bleeding kit - I paid $16 at autozone. If this is necessary, your brakes will feel, "soft" and the pedal will sink lower than normal. It should NOT sink all the way to the floor and if anything doesn't feel right, don't chance it. Get help.
Test drive - you shouldn't hear or feel anything out of the ordinary.
Any time you change a rotor or a hub, you may have rotor run out problems. You could experience a vibration during driving or braking, or a "judder". This means the rotor isn't perfectly flat and/or parallel on both sides, or not fully seated against the hub. There's a great thread about that right here:
///4829&page=2
Not counting set up or clean up, the wrench turning took about 30 minutes. If it's your first time, give yourself a couple hours.
So there are some extra steps in here because I'm running a Stoptech 14" BBK and Ichiba 20mm spacers. I'm doing the right front hub for this DIY. Did the left front a few days ago.
Anyway, You need:
car jack
jack stand
Breaker Bar
21mm socket
19mm socket
10mm socket
socket wrench/ratchet
Torque wrench (83ft-lbs)
C-clamp
flat head screwdriver
socket extension
Coat hanger or other wire
about 12" angle iron or "L" bar stock - could be slightly longer or shorter for your car.
zip ties
wire brush
WD-40 or PB blaster
shop rags
First remove the wheel center cap using a flathead screwdriver.
Break the nuts on the wheel with the 21mm socket and breaker bar.
Jack up the car and put a jack stand in place.
Remove the wheel:
Here's a little tool to keep the rotor from spinning while breaking the nuts on the spacer. Place a peice of angle iron or "L" bar stock so that the edge is wedged up against the vane of the rotor. That way while turning the nuts counter clockwise, the rotor can't move:
Break the nuts on the spacer and remove the spacer. These Spacer nuts use the 19mm socket.
Next, stick the key in the ignition and unlock steering (no need to start the engine) so you can turn the wheel all the way to the side you are working on (right in this case). This will make taking the caliper and hub off much easier - giving better bolt access. Turn the wheel slowly since the car is jacked up. After the wheel is turned, remove the key.
Break the bolts on the caliper torque member (both OEM and Stoptech are 19mm). Use the coat hanger, wire or zip ties to hang the caliper from the suspension spring, so that there is no strain on the brake line. NEVER hang the caliper from the brake line.
The rotor should come off now. Grab two hands and pull. If it's stuck, smack it with a rubber mallet. For a really tough stuck hub, place a peice of wood over the rotor and hit it with a sledge. Not a huge swing or anything, but start small and use increasingly harder hits until it is un-stuck.
Remove the ABS sensor. If you try to pull off the hub without FIRST removing the sensor, you could damage the sensor. It takes one 10 mm socket. Unscrew it all the way and the sensor slides right out. Use a zip tie to hold it up and out of the way. This shot is from behind the knuckle/hub, looking out at the ABS sensor:
You can see two of the hub bolts in the previous picture. Four bolts hold the hub to the knuckle and come out with the 19mm socket and breaker bar.
Once the bolts are out, the old hub can be pretty stuck in there. PB Blaster or WD-40 couldn't hurt. Use the breaker bar as a sliding hammer by pulling the handle through the hub from the back. It took a few hard smacks to get it out. Old and busted:
Expect it to come off unexpectedly - it's pretty heavy on the end of a 24" breaker bar. Maybe put some towels down as a cushion.
Next you have to pry loose the dust shield. Just use a flat head screwdriver and a little WD-40 if you need it.
Clean all the mating surfaces of the knuckle. Use a wire brush for oxidation, or WD-40 and a rag. Wipe down whatever is in reach.
The dust shield will probably slide right on to the new hub. Line up the bolt holes and take a look at where the ABS sensor hole is to make sure there is no interference. The sensor will slide into a slot in the hub. If the slot is not there, then the hub is upside down. Just hold the hub in place and get any two opposite corner bolts started by hand. This will line up the dust shield and ABS slot and make the other two bolts easier to install. Tighten all four bolts all the way down by hand, or use a ratchet for fully seating the hub once you can't turn by hand. Then use the torque wrench and the 19mm socket to set them all to 115 ft-lbs. New hotness:
After torquing the bolts, re-install the ABS sensor. Wipe it down with a clean towel first.
Then the rotor goes back on. Make sure both the hub and rotor mating surfaces are clean. Use a couple of lug nuts backwards to seat the rotor on the hub temporarily.
Spin the rotor to make sure it doesn't contact the dust shield. Watch your fingers when you do this. If you hear the rotor contact, just lightly bend the dust shield away from the rotor.
Grab the caliper and try to keep slack in the brake line - try not to put any tension on the line.
Once again, hand thread in the 19mm torque member bolts and get them fully seated. Wiggle the caliper a little while hand tightening and the bolts shouldn't resist. Use the torque wrench to 125 ft-lbs.
Now remove the temporary lugs from the rotor.
The Ichiba V2 spacers come with a hub centering ring specific to the FX hub. It slides on easily to the new hub.
Then the spacer slides over the ring. The 19mm lug nuts are all threaded on by hand as far as possible.
Again, use the L stock/angle iron to immobilize the rotor. This time, the bar will need to be on the opposite side of the rotor - by the caliper, because it will want to spin the opposite way. Use a torque wrench to torque the spacer nuts to 83 ft-lbs each, in a star pattern.
Now put the wheel back on, again hand threading on the 21mm lug nuts. After hand tight, use a ratchet on each nut until the wheel tries to spin.
Remove the jack stand and lower the car, then use the torque wrench to 83 ft-lbs in a star pattern on the wheel lug nuts.
Yer done.
Sometimes when moving a caliper around, air bubbles can form in the lines. It might be necessary to bleed your brakes. To do that DIY you'll need a one man brake bleeding kit - I paid $16 at autozone. If this is necessary, your brakes will feel, "soft" and the pedal will sink lower than normal. It should NOT sink all the way to the floor and if anything doesn't feel right, don't chance it. Get help.
Test drive - you shouldn't hear or feel anything out of the ordinary.
Any time you change a rotor or a hub, you may have rotor run out problems. You could experience a vibration during driving or braking, or a "judder". This means the rotor isn't perfectly flat and/or parallel on both sides, or not fully seated against the hub. There's a great thread about that right here:
///4829&page=2
Not counting set up or clean up, the wrench turning took about 30 minutes. If it's your first time, give yourself a couple hours.
Attachments
-
 IMG_0886.jpg70.9 KB · Views: 85
-
 IMG_0888.jpg87.7 KB · Views: 91
-
 IMG_0889.jpg49.7 KB · Views: 90
-
 IMG_0890.jpg74.6 KB · Views: 72
-
 IMG_0891.jpg57.7 KB · Views: 63
-
 IMG_0892.jpg55 KB · Views: 76
-
 IMG_0893.jpg44.8 KB · Views: 73
-
 IMG_0894.jpg70.5 KB · Views: 103
-
 IMG_0895.jpg63.5 KB · Views: 71
-
 IMG_0896.jpg62.9 KB · Views: 79
-
 IMG_0897.jpg102.7 KB · Views: 69
Last edited:


