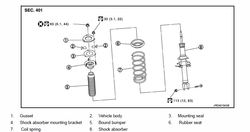

- Location
- Westchester, New York
- Car
- 09 FX50
Hey iS,
Got my GTSPEC STB in the other day and had a light workload and beautiful weather so decided to tackle this myself this afternoon.
Right off the bat: if you are not mechanically inclined by any means, do not try and do this. It's not actually "hard" per se, but it's a PITA to get to the six bolts you need to get to - I mean uninstalling plastics, undoing hoses, taking off intakes - Just to give you room to work
(of course, this may just be because I had limited tools - but isn't that the spirit of a DIY?)
I had never done engine work on my FX50 besides changing the filters to K&N so it took some time to learn how to undo everything, etc.
Things you need:
PATIENCE
12mm, 17mm, 10mm, + Extension or deep socket.
Screwdriver (Flathead)
Pliers
Allen wrench set (Not sure exactly which size is needed - I think new they come with one - It's rather large)
I think that's all.
P.S. to do this to an 09+ Fx35, it is essentially the same thing. you'll just have some more room...
STEP 1:
remove engine bay plastics. (not pictures until later, but remove EVERYTHING - including battery cover, etc. It gives you more room to work)
You do not need to remove the bottommost part above the grille.
For the engine cover, give it a tug upwards at the front, it will unsnap from two places, then pull it towards you. Make sure to undo the oil cap first.
Behold, your beautiful 5.0L v8
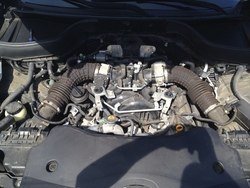 [/URL]
STEP 2:
The passenger side is actually a bit trickier than the driver's side - There are more things in the way. easiest thing to do it move things out of the way instead of trying to work around them.
red arrows indicate things I undid to get more access - move from right to left (Intake first, then smaller clamps and bolts) Those small bolts to the left are either 8 or 10mm , I forget.
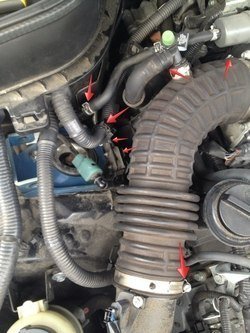
zoom:
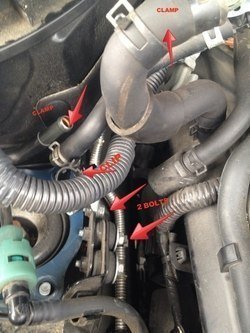 [/URL]
Removing those bolts in necessary in order to able to slide in the bracket piece - otherwise it will not go in.
The clip is a harness part that simply gets in the way - the clamp on top hose also gets in the way so best to move it all out of the way.
STEP 3:
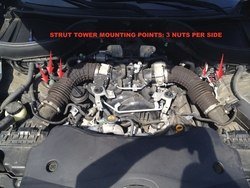
Get to the mounting points aka the strut towers. There are three (3) nuts on each side. Unbolt them but LEAVE THE FACTORY BLACK GASKET IN PLACE -
this is where you will need your PATIENCE and extension pieces - the bolts towards the rear are tricky due to clearance.
STEP 4:
Place brackets in place - bolt them down without the bar attached yet. make sure the "flat" side of the bracket is facing the front so that where the bar mounts is towards the front of the vehicle - they really only line up with the bolts one way anyway.
(no pic, you can sort of figure it out)
The passenger side one is tricky - make sure you remove those bolts and you need to sort of angle it in for it to fit right.
HAND TIGHTEN NUTS
STEP 5:
mock up the fitment to ensure the mounting points are at the right angle with each other - shift the brackets if needs (that's why I said hand tighten)
STEP 6:
BOLT down the brackets - reminder - they go on TOP of the black gaskets. This is needed for the bar to clear the intakes and motor. 12(?) mm
STEP 7:
PUT BACK EVERYTHING FROM STEP 2 - nothing should be in the way really when putting on the bar and tightening it. Do not put all plastics back yet
STEP 8:
BAR TIME - I started with the driver side first - put bar in with GTSPEC font readable from FRONT of car.
Put the bolt in from the front (no clearance otherwise) make sure to include the gaskets to ensure a tight fit
HANDTIGHTEN NUT
--
move to Passenger side - this was one of the tough parts for me -
you must give the bar some tension for it to work properly - so this involves pushing the bar AGAINST the driver side while sliding in the bolt on the mounting point. - you may need two people but I managed to do it myself - you can use a screwdriver to leverage the mounting point and put the bolt in. --- that was probably the hardest part besides some tough bolt access
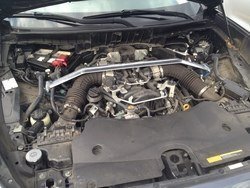 [/URL]
This is how much clearance you have under the bar to the motor - not much.
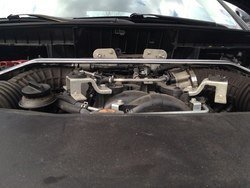 [/URL]
VOILA - YOU HAVE THE BRACKETS AND BAR IN PLACE
STEP 9:
tighten up the bolts holding the bar to the mounting brackets - hex key in on side, tighten sides against each-other. 17mm Nut
After tightening both sides, give the middle of the bar a few tugs - should be SOLID - no movement, clicking, clanking, etc. if there is, you didn't tighten everything enough. The point of this STB is to be rigid.
STEP 10:
make sure you have RECONNECTED ALL HOSES, BOLTED ALL BOLTS, CLAMPED ALL CLAMPS
begin to reinstall plastics; start with battery and brake covers
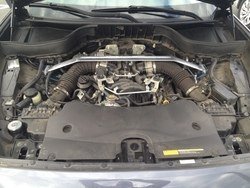 [/URL]
move on to side plastics; admire how COOL it looks with the shiny new bar over the motor.
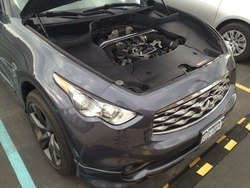 [/URL]
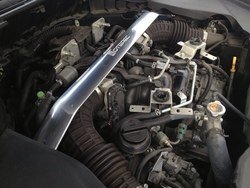 [/URL]
]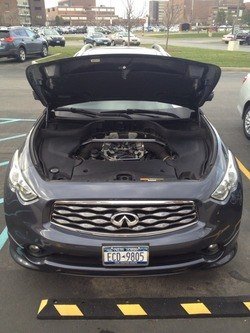 [/URL]
STEP 11
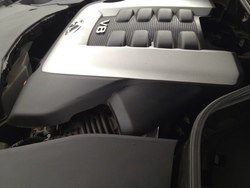
Reinstall engine cover --- it slides into place in the back (two holes in cover; bolts on motor) and SNAPs in two places in the front.
Push it down over snap places, give it a tug to ensure it's on there correctly.
Some have altered the foam to make more room but it fits without alteration....
(You can also skip this step and leave the cover OFF if that's your thing - it does look pretty neat....)
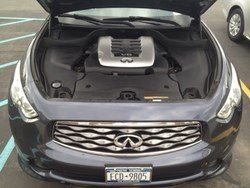 [/URL]
the bar is barely noticeable - it only peeks out on the sides a bit (unless you leave the covers off, of course.)
 [/URL]
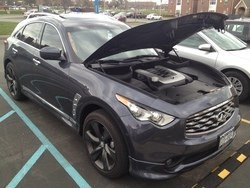
Admire your car returned back to before you dismantled it
 [/URL]
...and pat yourself on the back.
This took me about 2.5 hours but that included talking on the phone, talking to people, getting frustrated with bolts, dropping a bolt into the abyss, my OCD in lining up the brackets, etc.
Hope this helps! Sorry I'm not too specific with the bolt sizes and what not, I did this earlier today and completely forgot which was which.
This is a great basic mod that is definitely noticeable if you are OCD like I am - steering feels better, cornering a little more effortless, seems more "planted", etc. It's an excellent mod to make the car handle and perform better overall. I will probably get some of the other bars this summer.
LET THE MODDING CONTINUE!
Got my GTSPEC STB in the other day and had a light workload and beautiful weather so decided to tackle this myself this afternoon.
Right off the bat: if you are not mechanically inclined by any means, do not try and do this. It's not actually "hard" per se, but it's a PITA to get to the six bolts you need to get to - I mean uninstalling plastics, undoing hoses, taking off intakes - Just to give you room to work
(of course, this may just be because I had limited tools - but isn't that the spirit of a DIY?)
I had never done engine work on my FX50 besides changing the filters to K&N so it took some time to learn how to undo everything, etc.
Things you need:
PATIENCE
12mm, 17mm, 10mm, + Extension or deep socket.
Screwdriver (Flathead)
Pliers
Allen wrench set (Not sure exactly which size is needed - I think new they come with one - It's rather large)
I think that's all.
P.S. to do this to an 09+ Fx35, it is essentially the same thing. you'll just have some more room...
STEP 1:
remove engine bay plastics. (not pictures until later, but remove EVERYTHING - including battery cover, etc. It gives you more room to work)
You do not need to remove the bottommost part above the grille.
For the engine cover, give it a tug upwards at the front, it will unsnap from two places, then pull it towards you. Make sure to undo the oil cap first.
Behold, your beautiful 5.0L v8
[/URL]STEP 2:
The passenger side is actually a bit trickier than the driver's side - There are more things in the way. easiest thing to do it move things out of the way instead of trying to work around them.
red arrows indicate things I undid to get more access - move from right to left (Intake first, then smaller clamps and bolts) Those small bolts to the left are either 8 or 10mm , I forget.
zoom:
[/URL]Removing those bolts in necessary in order to able to slide in the bracket piece - otherwise it will not go in.
The clip is a harness part that simply gets in the way - the clamp on top hose also gets in the way so best to move it all out of the way.
STEP 3:
Get to the mounting points aka the strut towers. There are three (3) nuts on each side. Unbolt them but LEAVE THE FACTORY BLACK GASKET IN PLACE -
this is where you will need your PATIENCE and extension pieces - the bolts towards the rear are tricky due to clearance.
STEP 4:
Place brackets in place - bolt them down without the bar attached yet. make sure the "flat" side of the bracket is facing the front so that where the bar mounts is towards the front of the vehicle - they really only line up with the bolts one way anyway.
(no pic, you can sort of figure it out)
The passenger side one is tricky - make sure you remove those bolts and you need to sort of angle it in for it to fit right.
HAND TIGHTEN NUTS
STEP 5:
mock up the fitment to ensure the mounting points are at the right angle with each other - shift the brackets if needs (that's why I said hand tighten)
STEP 6:
BOLT down the brackets - reminder - they go on TOP of the black gaskets. This is needed for the bar to clear the intakes and motor. 12(?) mm
STEP 7:
PUT BACK EVERYTHING FROM STEP 2 - nothing should be in the way really when putting on the bar and tightening it. Do not put all plastics back yet
STEP 8:
BAR TIME - I started with the driver side first - put bar in with GTSPEC font readable from FRONT of car.
Put the bolt in from the front (no clearance otherwise) make sure to include the gaskets to ensure a tight fit
HANDTIGHTEN NUT
--
move to Passenger side - this was one of the tough parts for me -
you must give the bar some tension for it to work properly - so this involves pushing the bar AGAINST the driver side while sliding in the bolt on the mounting point. - you may need two people but I managed to do it myself - you can use a screwdriver to leverage the mounting point and put the bolt in. --- that was probably the hardest part besides some tough bolt access
[/URL]This is how much clearance you have under the bar to the motor - not much.
[/URL]VOILA - YOU HAVE THE BRACKETS AND BAR IN PLACE
STEP 9:
tighten up the bolts holding the bar to the mounting brackets - hex key in on side, tighten sides against each-other. 17mm Nut
After tightening both sides, give the middle of the bar a few tugs - should be SOLID - no movement, clicking, clanking, etc. if there is, you didn't tighten everything enough. The point of this STB is to be rigid.
STEP 10:
make sure you have RECONNECTED ALL HOSES, BOLTED ALL BOLTS, CLAMPED ALL CLAMPS
begin to reinstall plastics; start with battery and brake covers
[/URL]move on to side plastics; admire how COOL it looks with the shiny new bar over the motor.
[/URL][/URL]]
[/URL]STEP 11
Reinstall engine cover --- it slides into place in the back (two holes in cover; bolts on motor) and SNAPs in two places in the front.
Push it down over snap places, give it a tug to ensure it's on there correctly.
Some have altered the foam to make more room but it fits without alteration....
(You can also skip this step and leave the cover OFF if that's your thing - it does look pretty neat....)
[/URL]the bar is barely noticeable - it only peeks out on the sides a bit (unless you leave the covers off, of course.)
[/URL]Admire your car returned back to before you dismantled it
[/URL]...and pat yourself on the back.
This took me about 2.5 hours but that included talking on the phone, talking to people, getting frustrated with bolts, dropping a bolt into the abyss, my OCD in lining up the brackets, etc.
Hope this helps! Sorry I'm not too specific with the bolt sizes and what not, I did this earlier today and completely forgot which was which.
This is a great basic mod that is definitely noticeable if you are OCD like I am - steering feels better, cornering a little more effortless, seems more "planted", etc. It's an excellent mod to make the car handle and perform better overall. I will probably get some of the other bars this summer.
LET THE MODDING CONTINUE!
Last edited: